|
Mista Ballista's engine operates on torsion from twisted rope bundles. One of the biggest challenges
of torsion for this machine has been adding the twist. An onager is pretty straight forward in that a large lever and gravity can be used. With our ballista, the direction of twist is sideways, so an alternate means of twisting is needed.
The 2007 Chunk was the last year we were willing to put up with all the broken parts
resulting from tightening our rope bundles. We had been breaking 3/8" chain and shearing 1" steel pins on a regular basis. We devised a plan to let us wind the
machine safely, and in a way that would enable us to recycle the maximum number of parts
from this effort in some future large machine.
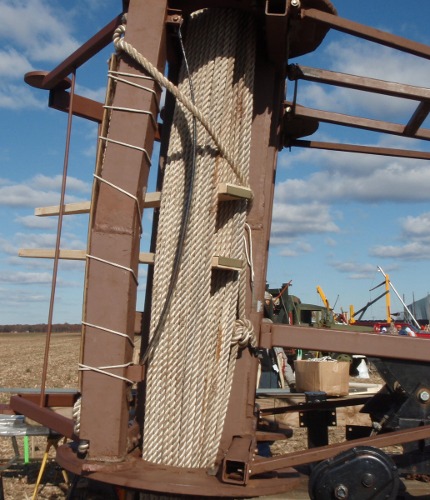
The twisted ropes are held in place via a Modiolus and Epizygis. You can read about how we built them on the
Modiolus and Epizygis page.

In previous systems, we attached an arm to our modiolus, similar to our competitors. In the new system we started with
giant sprockets from Martin Sprockets. If you've read through The Book of the Crossbow, giant gears are likely familiar
to you. As it turns out, the archaeological record doesn't include any gear based modiolii. Fortunately, this is not
a historically accurate machine.
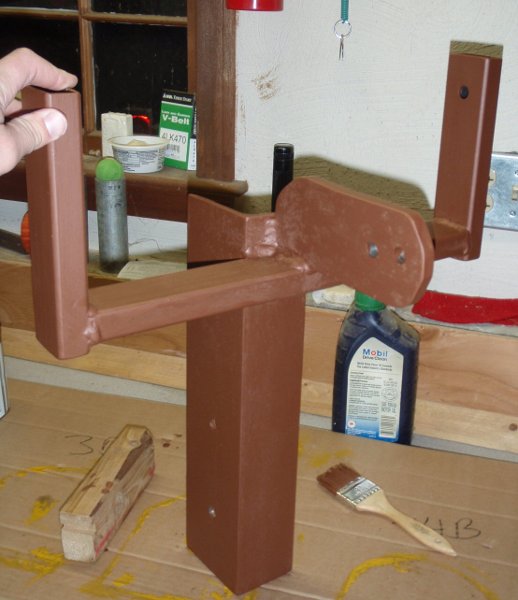
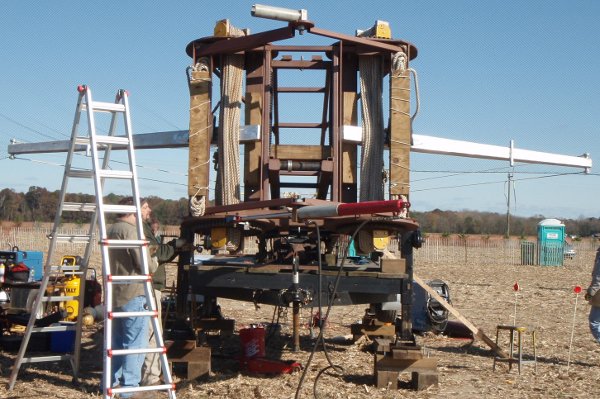
 While we did acquire some rather large hydraulic motors, we don't have a place to mount them on Mr. B. Instead we had to build out
the frame so there was a convenient location to mount a hydraulic cylinder. The cylinder is mounted in a trunnion,
so the donut at the end of the frame is our trunnion mounting point.
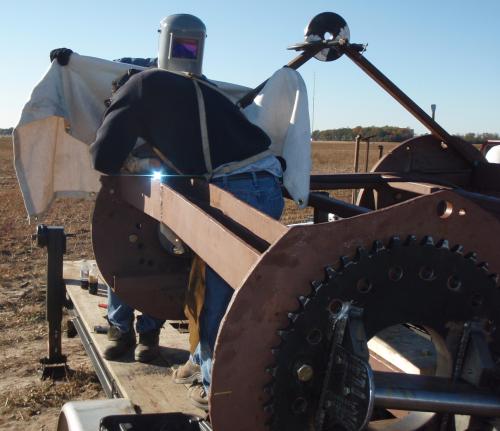
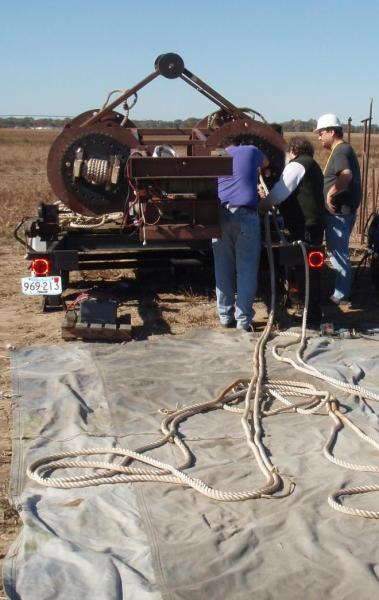
Here Karl is welding the framework into place after arriving at the chunk site.
While we did acquire some rather large hydraulic motors, we don't have a place to mount them on Mr. B. Instead we had to build out
the frame so there was a convenient location to mount a hydraulic cylinder. The cylinder is mounted in a trunnion,
so the donut at the end of the frame is our trunnion mounting point.
Here Karl is welding the framework into place after arriving at the chunk site.
 Here is the completed hydraulic cylinder trunnion mounting frame.
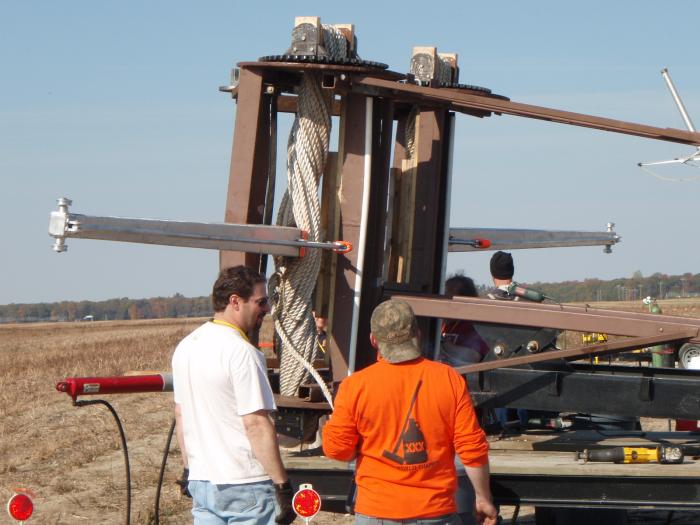
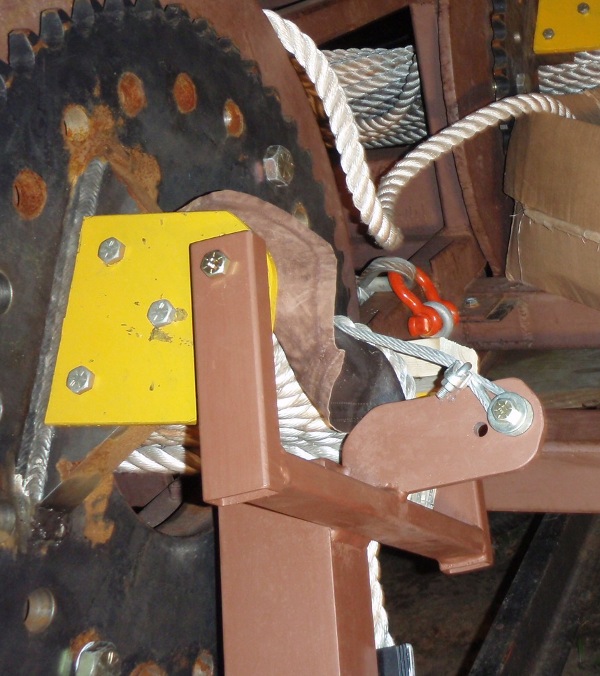
 Once the bundles and frame is in place, the trunnion (gray) is bolted onto the trunnion mount.
Our red hydraulic cylinder is then inserted into the trunnion.
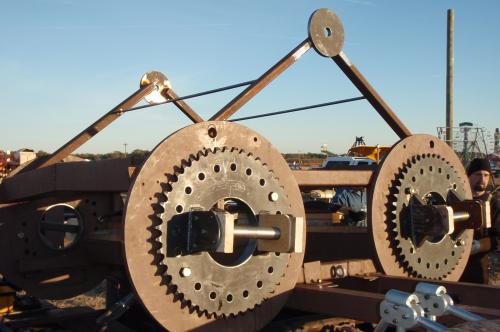
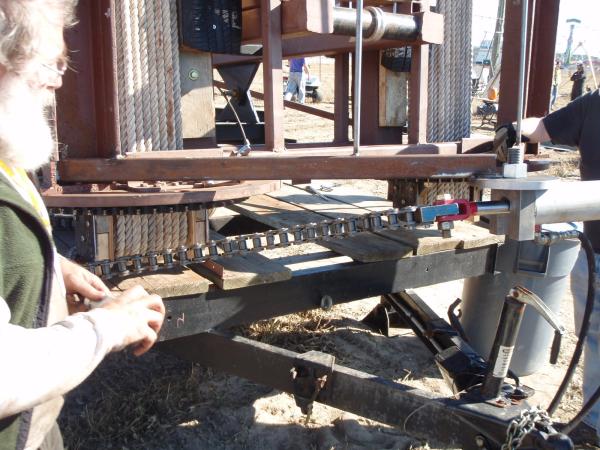
We attached a custom connector between the cylinder and our new roller chain.
This chain is like bicycle chain, except much, much bigger, series 140H.
Once the bundles and frame is in place, the trunnion (gray) is bolted onto the trunnion mount.
Our red hydraulic cylinder is then inserted into the trunnion.
We attached a custom connector between the cylinder and our new roller chain.
This chain is like bicycle chain, except much, much bigger, series 140H.
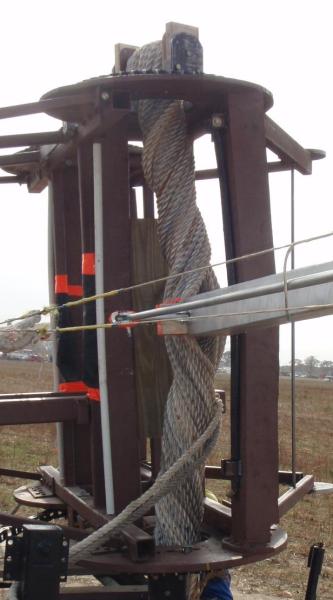
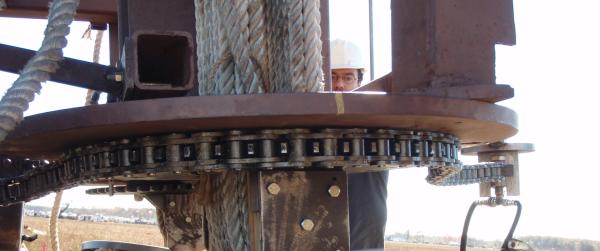 The roller chain is wrapped around our sprocket like a giant bicycle. The hydraulics then pull on the roller
chain, and add torsion to the system.
The roller chain is wrapped around our sprocket like a giant bicycle. The hydraulics then pull on the roller
chain, and add torsion to the system.
There are two ways to add power into a torsion bundle. One is to twist the rope, the other is to pre-tension the rope.
Pretensioning occurs before any twist, or even arm insertion. Most competition machines add perhaps 50lbs of pretension,
or whatever they can put into the bundle by muscling the rope in. Historically, windlasses, wedges, and other
mechanical assistance would be used to pre-stretch the rope into the system.
At the 2008 Chunk, we wound our bundle loose. For the 2009 Chunk, we applied around
1000lbs of pretension per strand.
This section compares the results of the two systems.
 At the 2008 Chunk, we added only minimal pretension. We were more concerned with just getting the rope into the bundle for
our first competition shot.
At the 2008 Chunk, we added only minimal pretension. We were more concerned with just getting the rope into the bundle for
our first competition shot.
Filling in the bundle this way is a quick hand-over-hand operation (quick meaning only a few hours to load 1000 feet of 1" rope). Each strand is pulled on by one person before passing the
the rope through for the next lay in the bundle.
 It took one full twist of the bundle before we felt comfortable removing the arm-stands which keep the arms from drooping.
Granted, the first 1/2 twist was done by hand which wasn't too bad. However, it takes a fair amount of work to hydraulicly add the
last half twist into all 4 corners of the machine.
It took one full twist of the bundle before we felt comfortable removing the arm-stands which keep the arms from drooping.
Granted, the first 1/2 twist was done by hand which wasn't too bad. However, it takes a fair amount of work to hydraulicly add the
last half twist into all 4 corners of the machine.
 After adding 1-3/4 twist into the bundle, we generated about 4500 lbs of force at the trigger. As you can see from this picture, the bundle, once twisted up, acts like a single piece of rope, or a giant rubber band. This made it easy for the torque
in the bundle to deflect the bundle, and caused our arms to strike the outer stanchion.
After adding 1-3/4 twist into the bundle, we generated about 4500 lbs of force at the trigger. As you can see from this picture, the bundle, once twisted up, acts like a single piece of rope, or a giant rubber band. This made it easy for the torque
in the bundle to deflect the bundle, and caused our arms to strike the outer stanchion.
In this picture, you can also see that the leaf springs on the outer stanchion are completely flattened. These are springs
from the back-end of a Ford Explorer, and they are bottomed when the machine is at rest. That's a lot of force.
This bundle deflection allowed the arms to strike the outer stanchion during firing, eventually breaking them.
|
2009 adding 1000lbs of Pretension per strand
|
Unlike the 2008 bundle layout which just needed three sets of hands, the 2009 layup needed a new set of tools to add
the desired pretension into the system.
 The first step was some sort of way to grab the rope so we could pull on it with 1000 lbs of force. These inline clamps
were designed and made mostly by Jeff, then modified heavily during use. This style of clamp is not really available
for purchase at the 1" rope size we were using at prices we felt we could afford. We also didn't really know how to make
it work reliably, so they came out a bit ugly as we added more and more metal to the cam in order to prevent them
from pulling through.
The first step was some sort of way to grab the rope so we could pull on it with 1000 lbs of force. These inline clamps
were designed and made mostly by Jeff, then modified heavily during use. This style of clamp is not really available
for purchase at the 1" rope size we were using at prices we felt we could afford. We also didn't really know how to make
it work reliably, so they came out a bit ugly as we added more and more metal to the cam in order to prevent them
from pulling through.
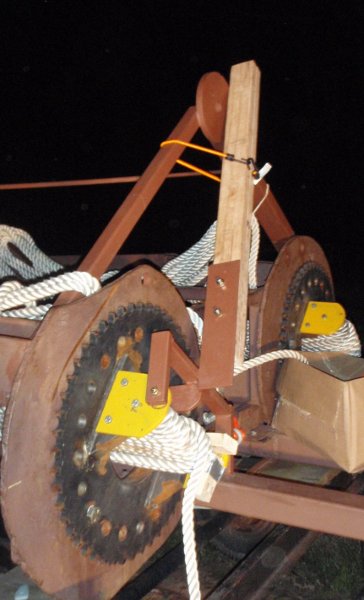
 The next order of business was to fabricate "The Moose". Designated "Moose" by it's shape, the "antlers" attach to the
plates that hold in the epizygii. The "nose" of the moose bolts onto the cable which pulls on the rope clamp. The
purpose of the "nose" is to reach inside the bundle, and also pull on the clamp maximizing the
amount of linear pull put into the rope.
The next order of business was to fabricate "The Moose". Designated "Moose" by it's shape, the "antlers" attach to the
plates that hold in the epizygii. The "nose" of the moose bolts onto the cable which pulls on the rope clamp. The
purpose of the "nose" is to reach inside the bundle, and also pull on the clamp maximizing the
amount of linear pull put into the rope.
 Here is the moose attached to the machine by the antlers after pulling out 6 inches of rope.
 Here is a picture of the moose with it's nose in the modiolus waiting to pull on a strand. The 4 foot lever is bungied
to the frame to keep it from falling down.
Here is a picture of the moose with it's nose in the modiolus waiting to pull on a strand. The 4 foot lever is bungied
to the frame to keep it from falling down.
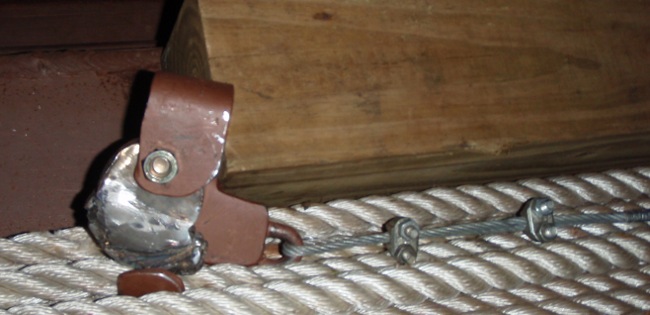 Here is an image of the rope clamp in action. The cam bites into the rope, and the moose provides the leverage needed to haul
6 inches of rope out of the system, which is, for a 7 foot strand of 1" nylon, about 8% of its working load.
Here is an image of the rope clamp in action. The cam bites into the rope, and the moose provides the leverage needed to haul
6 inches of rope out of the system, which is, for a 7 foot strand of 1" nylon, about 8% of its working load.
 Here is an image of the whole bundle with one pretensioned strand. The moose is in the "pull" position. The rope clamp (pointed
to by the white arrow) is pulling on a rope strand. As you may be able to guess from the picture, pulling on the bottom strand
is actually pretensioning the upper strand, with the rope being dragged over the epizygis.
Here is an image of the whole bundle with one pretensioned strand. The moose is in the "pull" position. The rope clamp (pointed
to by the white arrow) is pulling on a rope strand. As you may be able to guess from the picture, pulling on the bottom strand
is actually pretensioning the upper strand, with the rope being dragged over the epizygis.
The entire process or adding pre-tension from start to finish took a week from Tuesday after work through Saturday, or about 24 hours of labor. The second bundle occupied only 7 of those hours, so when we do this again, we should be able to finish in much less time.
|
2009 Pretensioning Results
|
 One of the drawbacks to all that pretension is that you can't just insert the arms into the bundle.
Here you can see two specially crafted bundle wedges we made to separate the two sides of the bundle.
Once the two sides of the skein are separated, the arms can be inserted, and the wedges removed.
One of the drawbacks to all that pretension is that you can't just insert the arms into the bundle.
Here you can see two specially crafted bundle wedges we made to separate the two sides of the bundle.
Once the two sides of the skein are separated, the arms can be inserted, and the wedges removed.
 Unlike in 2008, it only takes 1/4 twist in the bundle to hold the arms in the air. Already, a big win
from 2008 which took much more twist to create the power needed to do this.
Unlike in 2008, it only takes 1/4 twist in the bundle to hold the arms in the air. Already, a big win
from 2008 which took much more twist to create the power needed to do this.
We eventually took shots with 1/2 twist, 3/4 twist for our first two shots. Sadly, these shots both pied because
of pouch problems instead of torsioning problems. What a change from 2008.
Here is a video of Mr. B shooting a practice shot with only 3/4 a twist in the bundle. This is less twist than
was needed to just hold the arms in in 2008. We generated just under 3000lbs of force on the trigger for this shot.
 Here is a view similar to the 2008 bent bundle view. As you can see with 1 full twist in the bundle, there is minor deflection
off the arm stop compared to last year. In addition, the arm is sitting back several degrees, which is the ideal for a bow.
By way of side effect, the arms are not deflecting the leaf-spring on the front stanchion, which means the arms won't strike
the outer stanchion, and thus we save our arms for another year. Huzzah!
Here is a view similar to the 2008 bent bundle view. As you can see with 1 full twist in the bundle, there is minor deflection
off the arm stop compared to last year. In addition, the arm is sitting back several degrees, which is the ideal for a bow.
By way of side effect, the arms are not deflecting the leaf-spring on the front stanchion, which means the arms won't strike
the outer stanchion, and thus we save our arms for another year. Huzzah!
Here is a video of Mr. B shooting our final competition shot with a full twist in the bundle. This is same amount of twist as
was needed to just hold the arms in in 2008. We generated 4400lbs of force on the trigger for this shot, and at 693 feet, it represented our personal best.
A clear win for the effort needed to pretension a bundle.
|
Additional Pages for Mista Ballista
|
|
Mista Ballista
|
 Mista Ballista is _Team Tormentum's_ *Torsion Division* competition catapult.
|
|
Mista Ballista : Modiolus and Epizygis
|
 In 2008, Dave devised a new system for managing the torsion in Mista Ballista with his friends Karl Hamm and Kevin Cheney.
This represents a large investment in our machine in these custom parts.
In 2008, Dave devised a new system for managing the torsion in Mista Ballista with his friends Karl Hamm and Kevin Cheney.
This represents a large investment in our machine in these custom parts.
|
|
Mista Ballista : Bowstring
|
 The bowstring has been one of the most challenging pieces of our torsion engine. It is the last piece to get right, and has been the most likely part to fail in any given year.
|
|
Mista Ballista : Rope Bundles
|
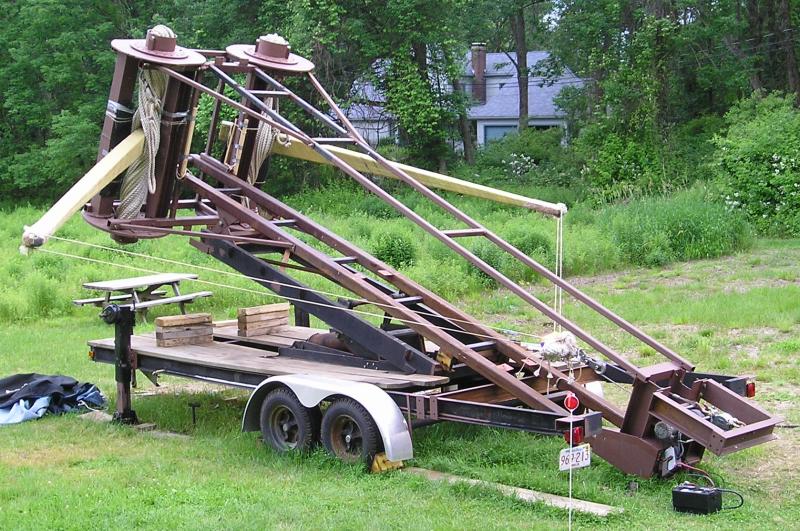
 The rope bundles are the main engine of the machine. The framework that holds
everything together is about 24 ft long, and 6 feet tall.
The rope bundles are the main engine of the machine. The framework that holds
everything together is about 24 ft long, and 6 feet tall.
|
|
Mista Ballista : 2005 Rope bundle Upgrade
|
 At the 2004 chunk the main stanchions for the torsion frames were bent by the impact of the arms.
You can see the animation of when this happened on the Mista Ballista Arms page.
At the 2004 chunk the main stanchions for the torsion frames were bent by the impact of the arms.
You can see the animation of when this happened on the Mista Ballista Arms page.
|
|
Mista Ballista : 2006 Rope Bundle Reconfiguration
|
 In 2005 we broke our fancy fiberglass arms. In 2006 we got the new carbon fiber arms
and video taped them in action in the summer at our 2006 History Chunk. This led us to discover how much they bounced around
the outer stanchions. We were getting multiple recoils after every shot, sometimes back at least 30 degrees. That was also just with 2000 lbs of pullback, which is much less than we expect to use in competition.
In 2005 we broke our fancy fiberglass arms. In 2006 we got the new carbon fiber arms
and video taped them in action in the summer at our 2006 History Chunk. This led us to discover how much they bounced around
the outer stanchions. We were getting multiple recoils after every shot, sometimes back at least 30 degrees. That was also just with 2000 lbs of pullback, which is much less than we expect to use in competition.
|
|
Mista Ballista : Frame
|
 The framework for the Ballista had to be built strong enough to resist the pullback, and to hold up
the 2500 pounds we currently estimate of our engine. It must also push it up 16 feet in the air!
The framework for the Ballista had to be built strong enough to resist the pullback, and to hold up
the 2500 pounds we currently estimate of our engine. It must also push it up 16 feet in the air!
|
|
Mista Ballista : Trailer
|
 One of our goals for the 2003 season is to acquire a dedicated trailer for Mista Ballista.
|
|
Mista Ballista : Torsion
|
Mista Ballista's engine operates on torsion from twisted rope bundles. One of the biggest challenges
of torsion for this machine has been adding the twist. An onager is pretty straight forward in that a large lever and gravity can be used. With our ballista, the direction of twist is sideways, so an alternate means of twisting is needed.
|
|
Mista Ballista : Arms
|
 After the failure of our arms in 2007, a new tactic was needed. Dave contacted his friends Karl Hamm and Kevin Cheney about designing
and building a set of ballista arms out of aluminum. Aluminum was chosen for its strength and light weight.
After the failure of our arms in 2007, a new tactic was needed. Dave contacted his friends Karl Hamm and Kevin Cheney about designing
and building a set of ballista arms out of aluminum. Aluminum was chosen for its strength and light weight.
|
|
Mista Ballista : Deployment
|
 To travel to different chunkin' locations, we need to pack the system down onto our trailer.
Deploying from the folded up position is challenging and time consuming, taking a day and a half
at the 2002 chunk. This year at the 2003 Punkin Chunk, we were done in about 4 hours.
To travel to different chunkin' locations, we need to pack the system down onto our trailer.
Deploying from the folded up position is challenging and time consuming, taking a day and a half
at the 2002 chunk. This year at the 2003 Punkin Chunk, we were done in about 4 hours.
|
|
Mista Ballista : Hydraulic and Electric Power
|
 Mista Ballista uses hydraulics for lifting the engine to a 45 degree angle for firing, and also for winding the cord bundles.
We also like having electricity on hand since Mr. B has a tendency to break, and need on-field repairs. This page describes
what we are using to power up the system.
Mista Ballista uses hydraulics for lifting the engine to a 45 degree angle for firing, and also for winding the cord bundles.
We also like having electricity on hand since Mr. B has a tendency to break, and need on-field repairs. This page describes
what we are using to power up the system.
|
|
Mista Ballista : Mystery Parts
|
 All winter during 2003 we have been collecting the parts we need to accomplish our 2003 chunk goals.
Here are a bunch of pictures of these random parts. Can you guess what they are for?
All winter during 2003 we have been collecting the parts we need to accomplish our 2003 chunk goals.
Here are a bunch of pictures of these random parts. Can you guess what they are for?
|
|
Mista Ballista : Modiolus and Epizygis 2007
|
 This page describes the Modiolus and Epizygis system we used from 2002 through 2007. In 2008 we developed
a new system for twisting up Mista Ballista.
This page describes the Modiolus and Epizygis system we used from 2002 through 2007. In 2008 we developed
a new system for twisting up Mista Ballista.
|
|
Mista Ballista : Torsion 2007
|
 All torsion catapults depend on twisting the rope bundles to create the engine to drive the catapult. Mista Ballista went through
many phases as we attempted to add more power every year to our throw. This page describes the obsolete systems
we'd used in the past.
All torsion catapults depend on twisting the rope bundles to create the engine to drive the catapult. Mista Ballista went through
many phases as we attempted to add more power every year to our throw. This page describes the obsolete systems
we'd used in the past.
|
|
Mista Ballista : Arms 2006 - 2007
|
 This page describes the construction of our dearly departed Carbon Fiber composite arms. We miss them.
|
|
Mista Ballista : Failed Arms
|
 Building an arm for a torsion machine this large has proven to be very challenging.
Based on the experiences of our competitors, who also keep breaking arms, we find that
we are not alone in this dilemma.
Building an arm for a torsion machine this large has proven to be very challenging.
Based on the experiences of our competitors, who also keep breaking arms, we find that
we are not alone in this dilemma.
|
| 