|
The bowstring has been one of the most challenging pieces of our torsion engine. It is the last piece to get right, and has been the most likely part to fail in any given year.
Unfortunately for this website, pictures of bowstring construction has usually occurred away from cameras, or when the team was panicking to get a shot ready at the chunk, so this story will be a little sketchy.
 In 2010, we had settled on this basic design. The pouch was a knit rectangle, with key bowstring components running through the ends. The part of the bowstring woven through the pouch were relatively short segments about 2 ft long, ending with Brummel splices. Pullback ropes, longer than the pouch connector pieces also have Brummel splices on each end, connecting at the same place.
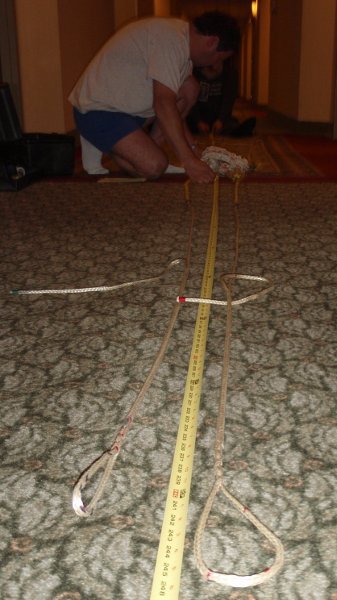
Finally, the actual bowstring that goes from the pouch to the tips of the arms also end with Brummel splices on end end, and link the pouch connectors and pullback lines together. The final lengths of the bowstring are wound into small bundles in this picture.
The rope we use for the bowline is vectran, a liquid crystal polymer approximately 1/4" thick, and 7000lb working load per strand.
 One of the tricks with the Brummel splice is that it must be created empty, meaning without anything inside the loop, or it must be created with access to the other end of the line. This is because the Brummel splice weaves in on itself. In this picture we could make the Brummel splice looping over an existing splice because the other end of the pullback line was free.
 In this picture you can see the outside end of the bowstring that loops over the arm tips. This end does NOT use Brummel splices. It doesn't need to because it will loop over a 2 inch disc on the end of the arm.
This picture from the 2009 Chunk was when we discovered that our bowstring was too long. Our final splices are non-traditional in that they can be adjusted to make the bowstring longer or shorted by a few inches. This helps accommodate the fact that the arms and bundles can shift for each deployment, and between shots.
To make them adjustable, we need to leave the tag ends quite long, and hanging out the side of the rope. That allows us to both draw some rope back out of the splice, or pull some back through the splice.
 In 2011, we decided that the knit pouch was causing us some serious problems. If you look at the picture above, you can see it is a bit lopsided. We decided to sew a pouch out of strips instead.
We started with industrial Velcro. Our experiments indicated it hold a lot of weight, and would allow us to make it adjustable. We sewed the strips together into a rectangle.
 The Velcro also gave us the ability to add a simple seat-belt to the pumpkin. This let us shorten the pouch so that half the pumpkin sat forward of the bowstring, and the seat belt would prevent it from falling out.
As you might guess, however, the Velcro wasn't strong enough. The sticky part was fine, but the side strips tore since the square we made was wrapped around around pumpkin.
 We added nylon straps from old seat-belts to the back of the Velcro for strength. This worked great.
 In addition to the new pouch, we added two other new elements listed here.
We added separators near the pouch. The previous year's high speed footage showed waves going across the bowline, and intersecting at the pumpkin, trashing it. In our testing this fall, those waves appeared to stop at the separators, protecting the pumpkin. These separators were made from phenolic tubing with dowel plugs in the end, and lashed to the bowline over some rubber tubing (to protect the bowstring.)
After adding separators, we noted that the bowstring rubbed our arm stops, so we added some pinch ropes there to keep things from rubbing.
 At the 2011 Chunk, it turned out that the Velcro wasn't good enough.
 Amy then sewed even more nylon strapping into the pouch in our hotel room. We also used Kevlar thread borrowed for Team Ethos and sewed the pouch onto the bowstring, fixing it to a single size.
 The new pouch worked great! Unfortunately, the pullback lines broke, and the bowline separators both broke, causing us to go back and change things up for 2012.
 We decided to replace both pullback lines even though we only broke one. You can see that the pullback line that survived (top) had its own issues near the splices, from all the stresses it is put under. You can see the new lines also, with fresh Brummel splices in one end. The other end needed to be spliced into the bowstring to cut back on the number of splices we had to undo to get it in.
 This shows the completed pouch, pullback lines, and bowlines, and how they are configured.
 In 2012, we also moved to aluminum bowline separators. Our first shot threw the separators off into the crowd behind us. We then added 'keeper lines' so that when the separators were forcefully removed from the bowline, they would dangle at the ends of the keeper line and not hit anyone in the head. Again.
In 2012, for our last competition shot, we thought it would be a good idea to try compounding the machine.
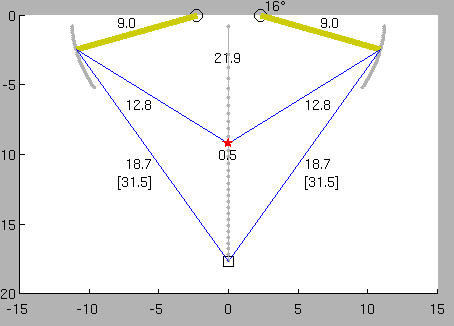 This diagram shows the basic idea behind compounding Mista Ballista. The pumpkin (the red star) is shown partway up the scapus. The arms (yellow) are about 9ft long from the bundle core. The overall arm sweep will be shorter because the bowline spools around the arm tips, and is extended to, and anchored at the winch at the back. As the arms are pulled back, the rope spools over the arm tips into the middle part of the bowstring, allowing the pumpkin to travel farther down the scapus per degree of arm rotation. If the arms rotate as quickly compounded as normal, that means the pumpkin will be moving even faster!
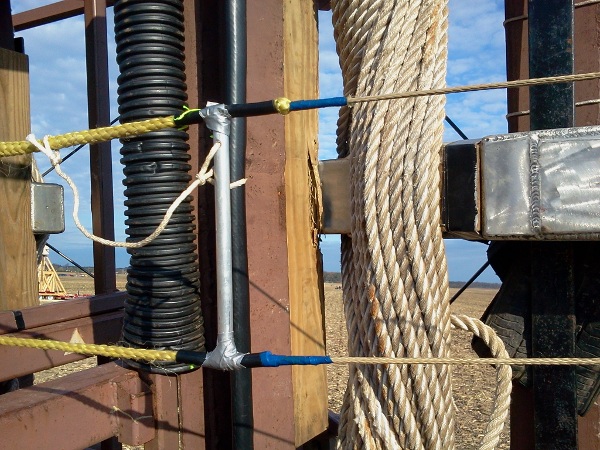
 A key component to compounding is adding pulleys to the arm tips. Kevin Cheney modified the rope connects for our arm tips to include handy guides to keep the bowstring from falling off. We weren't too worried about it sipping off during the shot, but after when everything is bouncing around. Kevin Cheney also smoothed out the grove the rope sits in.
These pulley spools were not meant to spin on the arm. Instead the bowstring is meant to slide over the pulley. Experiments with a drill press running at top speed, and the bowstring indicates that Vectran is a fine material and was unaffected by the friction. The nylon we tried melted, so we figured it was worth a try.
 Because some of our splices were not Brummel splices, and we still needed bowline length adjustability, we created these aluminum slice connectors. The point is to keep the splice open, so that the simple non-Brummel splice won't pull out. The simple cross aluminum disks were were welded together, and the bowstring zip-tied to the disks.
 We also created anchor bars that were about 10 ft long. On one end was welded a double pulley for the rope to wrap around. We ended up only using one side of the double pulley due to having to recover from other errors.
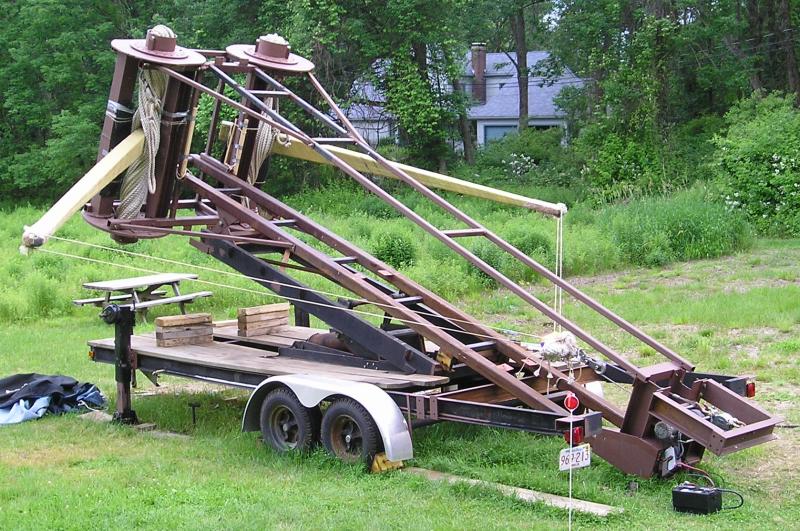
 Mista Ballista, the first large compounded ballista stands ready for our third competition shot on Sunday at the 2012 Punkin Chunk.
Compounded Mr. B in action.
|
Additional Pages for Mista Ballista
|
|
Mista Ballista
|
 Mista Ballista is _Team Tormentum's_ *Torsion Division* competition catapult.
|
|
Mista Ballista : Modiolus and Epizygis
|
 In 2008, Dave devised a new system for managing the torsion in Mista Ballista with his friends Karl Hamm and Kevin Cheney.
This represents a large investment in our machine in these custom parts.
In 2008, Dave devised a new system for managing the torsion in Mista Ballista with his friends Karl Hamm and Kevin Cheney.
This represents a large investment in our machine in these custom parts.
|
|
Mista Ballista : Bowstring
|
The bowstring has been one of the most challenging pieces of our torsion engine. It is the last piece to get right, and has been the most likely part to fail in any given year.
|
|
Mista Ballista : Rope Bundles
|
 The rope bundles are the main engine of the machine. The framework that holds
everything together is about 24 ft long, and 6 feet tall.
The rope bundles are the main engine of the machine. The framework that holds
everything together is about 24 ft long, and 6 feet tall.
|
|
Mista Ballista : 2005 Rope bundle Upgrade
|
 At the 2004 chunk the main stanchions for the torsion frames were bent by the impact of the arms.
You can see the animation of when this happened on the Mista Ballista Arms page.
At the 2004 chunk the main stanchions for the torsion frames were bent by the impact of the arms.
You can see the animation of when this happened on the Mista Ballista Arms page.
|
|
Mista Ballista : 2006 Rope Bundle Reconfiguration
|
 In 2005 we broke our fancy fiberglass arms. In 2006 we got the new carbon fiber arms
and video taped them in action in the summer at our 2006 History Chunk. This led us to discover how much they bounced around
the outer stanchions. We were getting multiple recoils after every shot, sometimes back at least 30 degrees. That was also just with 2000 lbs of pullback, which is much less than we expect to use in competition.
In 2005 we broke our fancy fiberglass arms. In 2006 we got the new carbon fiber arms
and video taped them in action in the summer at our 2006 History Chunk. This led us to discover how much they bounced around
the outer stanchions. We were getting multiple recoils after every shot, sometimes back at least 30 degrees. That was also just with 2000 lbs of pullback, which is much less than we expect to use in competition.
|
|
Mista Ballista : Frame
|
 The framework for the Ballista had to be built strong enough to resist the pullback, and to hold up
the 2500 pounds we currently estimate of our engine. It must also push it up 16 feet in the air!
The framework for the Ballista had to be built strong enough to resist the pullback, and to hold up
the 2500 pounds we currently estimate of our engine. It must also push it up 16 feet in the air!
|
|
Mista Ballista : Trailer
|
 One of our goals for the 2003 season is to acquire a dedicated trailer for Mista Ballista.
|
|
Mista Ballista : Torsion
|
 Mista Ballista's engine operates on torsion from twisted rope bundles. One of the biggest challenges
of torsion for this machine has been adding the twist. An onager is pretty straight forward in that a large lever and gravity can be used. With our ballista, the direction of twist is sideways, so an alternate means of twisting is needed.
Mista Ballista's engine operates on torsion from twisted rope bundles. One of the biggest challenges
of torsion for this machine has been adding the twist. An onager is pretty straight forward in that a large lever and gravity can be used. With our ballista, the direction of twist is sideways, so an alternate means of twisting is needed.
|
|
Mista Ballista : Arms
|
 After the failure of our arms in 2007, a new tactic was needed. Dave contacted his friends Karl Hamm and Kevin Cheney about designing
and building a set of ballista arms out of aluminum. Aluminum was chosen for its strength and light weight.
After the failure of our arms in 2007, a new tactic was needed. Dave contacted his friends Karl Hamm and Kevin Cheney about designing
and building a set of ballista arms out of aluminum. Aluminum was chosen for its strength and light weight.
|
|
Mista Ballista : Deployment
|
 To travel to different chunkin' locations, we need to pack the system down onto our trailer.
Deploying from the folded up position is challenging and time consuming, taking a day and a half
at the 2002 chunk. This year at the 2003 Punkin Chunk, we were done in about 4 hours.
To travel to different chunkin' locations, we need to pack the system down onto our trailer.
Deploying from the folded up position is challenging and time consuming, taking a day and a half
at the 2002 chunk. This year at the 2003 Punkin Chunk, we were done in about 4 hours.
|
|
Mista Ballista : Hydraulic and Electric Power
|
 Mista Ballista uses hydraulics for lifting the engine to a 45 degree angle for firing, and also for winding the cord bundles.
We also like having electricity on hand since Mr. B has a tendency to break, and need on-field repairs. This page describes
what we are using to power up the system.
Mista Ballista uses hydraulics for lifting the engine to a 45 degree angle for firing, and also for winding the cord bundles.
We also like having electricity on hand since Mr. B has a tendency to break, and need on-field repairs. This page describes
what we are using to power up the system.
|
|
Mista Ballista : Mystery Parts
|
 All winter during 2003 we have been collecting the parts we need to accomplish our 2003 chunk goals.
Here are a bunch of pictures of these random parts. Can you guess what they are for?
All winter during 2003 we have been collecting the parts we need to accomplish our 2003 chunk goals.
Here are a bunch of pictures of these random parts. Can you guess what they are for?
|
|
Mista Ballista : Modiolus and Epizygis 2007
|
 This page describes the Modiolus and Epizygis system we used from 2002 through 2007. In 2008 we developed
a new system for twisting up Mista Ballista.
This page describes the Modiolus and Epizygis system we used from 2002 through 2007. In 2008 we developed
a new system for twisting up Mista Ballista.
|
|
Mista Ballista : Torsion 2007
|
 All torsion catapults depend on twisting the rope bundles to create the engine to drive the catapult. Mista Ballista went through
many phases as we attempted to add more power every year to our throw. This page describes the obsolete systems
we'd used in the past.
All torsion catapults depend on twisting the rope bundles to create the engine to drive the catapult. Mista Ballista went through
many phases as we attempted to add more power every year to our throw. This page describes the obsolete systems
we'd used in the past.
|
|
Mista Ballista : Arms 2006 - 2007
|
 This page describes the construction of our dearly departed Carbon Fiber composite arms. We miss them.
|
|
Mista Ballista : Failed Arms
|
 Building an arm for a torsion machine this large has proven to be very challenging.
Based on the experiences of our competitors, who also keep breaking arms, we find that
we are not alone in this dilemma.
Building an arm for a torsion machine this large has proven to be very challenging.
Based on the experiences of our competitors, who also keep breaking arms, we find that
we are not alone in this dilemma.
|
| 