|
Building an arm for a torsion machine this large has proven to be very challenging.
Based on the experiences of our competitors, who also keep breaking arms, we find that
we are not alone in this dilemma.
|
Arms for 2002 - The steel box
|
 In 2002, our arm was a steel box section, 4"x4"x10' with a 1/8" thick wall.
Also on hand were two 5"x5"x6' long pieces of solid ash.
We debated what might happen if an ash arm broke (an exciting prospect to be sure)
and decided that if the steel gave way, it would be much safer.
In 2002, our arm was a steel box section, 4"x4"x10' with a 1/8" thick wall.
Also on hand were two 5"x5"x6' long pieces of solid ash.
We debated what might happen if an ash arm broke (an exciting prospect to be sure)
and decided that if the steel gave way, it would be much safer.
 Indeed, safety was key. During pullback, the arm bent over, and killed our chances for a
successful third shot.
Indeed, safety was key. During pullback, the arm bent over, and killed our chances for a
successful third shot.
|
Arms for 2003 - Bridged steel box
|
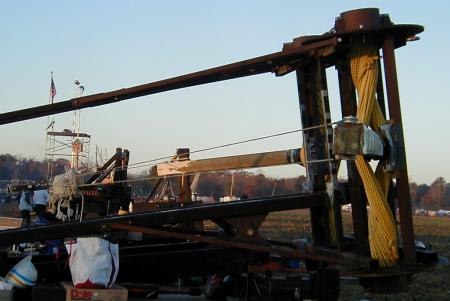
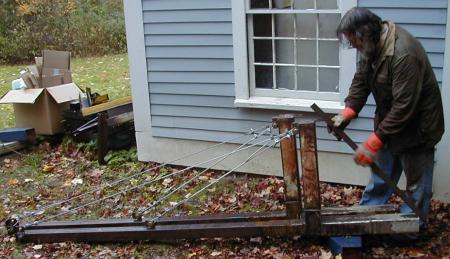 Jeff put in great effort to fabricate arms for us in 2003. Each arm weighed in at 130 lbs
with the same 4" box from the previous year, this time reinforced with an extra 1/4" of
steel all around the base plus new towers and 1/4" cabling for stays on the throwing side
and solid steel stays on the back side. Jeff is fitting the solid stays in this picture.
Jeff put in great effort to fabricate arms for us in 2003. Each arm weighed in at 130 lbs
with the same 4" box from the previous year, this time reinforced with an extra 1/4" of
steel all around the base plus new towers and 1/4" cabling for stays on the throwing side
and solid steel stays on the back side. Jeff is fitting the solid stays in this picture.
We also made a fine pair of 10' x 8" x 8" ash laminate arms, but for some reason I don't have any
good pictures of those. They were very heavy, and we decided to sell them to Team Chucky who already uses a similar design.
 Once installed, the removable solid steel stays in the back wrapped the outer stanchion.
This design worked well for holding back the massive force during pullback.
After each throw, however, we noticed that our steel stays were sagging. The pullback
force was slipping through the cable clamps. Obviously we did not use big enough cable
nor clamps! Instead we hand tightened each stay with a come-along after every shot.
Once installed, the removable solid steel stays in the back wrapped the outer stanchion.
This design worked well for holding back the massive force during pullback.
After each throw, however, we noticed that our steel stays were sagging. The pullback
force was slipping through the cable clamps. Obviously we did not use big enough cable
nor clamps! Instead we hand tightened each stay with a come-along after every shot.
 We may have held the pullback in check, but sadly these arms bent just past the
reinforcement during recoil. The mass of the arm tip stopping so abruptly caused
this arm to buckle forward at the point where a hole was. That's some serious deceleration. That'll teach us to buy scrap steel with little holes in it.
We may have held the pullback in check, but sadly these arms bent just past the
reinforcement during recoil. The mass of the arm tip stopping so abruptly caused
this arm to buckle forward at the point where a hole was. That's some serious deceleration. That'll teach us to buy scrap steel with little holes in it.
|
Arms for 2004 - Fiberglass/HardWire composite
|
In 2004 Eric contacted Mark Caron, a friend who is now working for a company that makes
fancy composite materials with fiberglass and kevlar. Mark thought that making
a pair of arms for a Ballista sounded pretty interesting.
 Mark Caron works for Saint-Gobain Technical Fabrics
and brought several very nifty materials to make up the arms. The shop we used is owned
by Custom Composite Technologies and when
we were there, they were building molds for making molds for boat hulls. That's right,
they made meta-molds.
Mark Caron works for Saint-Gobain Technical Fabrics
and brought several very nifty materials to make up the arms. The shop we used is owned
by Custom Composite Technologies and when
we were there, they were building molds for making molds for boat hulls. That's right,
they made meta-molds.
Please visit the Sponsors page for details on these
companies.
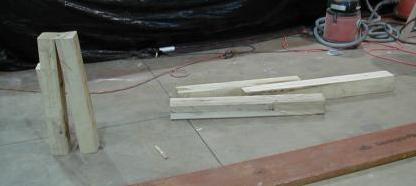 In the foreground are our ash blanks to be used
as the core of the new arms. One short section would be at the base where the rope
will compress it, and another small bit will be at the very end where the bowstring
attachment pins will be.
In the foreground are our ash blanks to be used
as the core of the new arms. One short section would be at the base where the rope
will compress it, and another small bit will be at the very end where the bowstring
attachment pins will be.
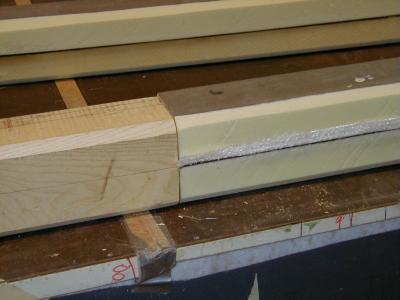 Next, an 8' long foam core was cut and glued together with a 45 fiberglass weave
webbing. This core was fit to the same size as our ash arm blanks. The foam is
a simple closed cell roofing foam weighing in at 2lbs/square foot. Pay attention
to the "closed cell" attribute for later.
Next, an 8' long foam core was cut and glued together with a 45 fiberglass weave
webbing. This core was fit to the same size as our ash arm blanks. The foam is
a simple closed cell roofing foam weighing in at 2lbs/square foot. Pay attention
to the "closed cell" attribute for later.
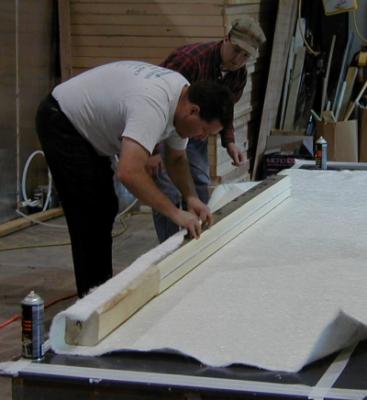 Here Mark (white shirt) shows me how to wrap the arm in a fiberglass matt.
The matt soaks up resin and helps hold the whole thing together.
Here Mark (white shirt) shows me how to wrap the arm in a fiberglass matt.
The matt soaks up resin and helps hold the whole thing together.
 Next several layers of unidirectional fiberglass were laid out onto the 45 weave
sheet that would wrap the entire arm. There were several layers of this fiberglass
in addition to one layer of hardwire (in our hands in this picture.)
The unidirectional fiberglass provides strength to the beam in the direction we intend
to stress it.
Next several layers of unidirectional fiberglass were laid out onto the 45 weave
sheet that would wrap the entire arm. There were several layers of this fiberglass
in addition to one layer of hardwire (in our hands in this picture.)
The unidirectional fiberglass provides strength to the beam in the direction we intend
to stress it.
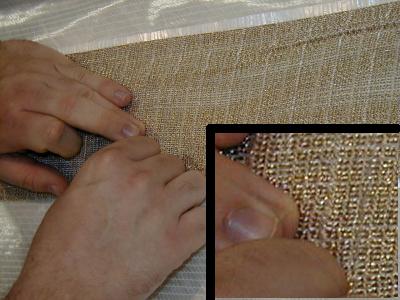 Using the hardwire was not very easy. We were using some remnants Mark had available
where each golden strand was sewn together. We then had to spread it out, and push
out all the wrinkles. That may sound easy, but try pushing out wrinkles in some
medieval armor and get back to me.
Using the hardwire was not very easy. We were using some remnants Mark had available
where each golden strand was sewn together. We then had to spread it out, and push
out all the wrinkles. That may sound easy, but try pushing out wrinkles in some
medieval armor and get back to me.
Each strand in this weave has a 350lb tensile strength. At 20 wires per inch
over 5 inches of arm, that's a whole lot of tensile strength. One of the nifty
features of this wire is that it has high ballistic resistance. Translate: We have
some armor plated arms. Nifty!
Read more about hardwire at Hardwire webpage.
If you want to see a close up of the hardwire, find us at the 2004 Punkin Chunk
and take a peek for yourself. The fiberglass cures clear and you can see it inside
the arm. Jeff might also bring the sample he made.
 After armor plating both sides of two arms we wrapped the arm in the 45 weave originally
pictured (see arm on right). We then calculated where the arm will be striking the
two stanchions, and a couple layers of kevlar were added in those positions. The kevlar
is the yellowish bits of fabric on the left/right sides, slightly offset on the arm on
the right. The kevlar is KVM-1308 eglass hybrid made by Mark's company.
After armor plating both sides of two arms we wrapped the arm in the 45 weave originally
pictured (see arm on right). We then calculated where the arm will be striking the
two stanchions, and a couple layers of kevlar were added in those positions. The kevlar
is the yellowish bits of fabric on the left/right sides, slightly offset on the arm on
the right. The kevlar is KVM-1308 eglass hybrid made by Mark's company.
The next step is to prepare the arms for resin infusion. The bluish fabric is peel-ply
nylon fabric coated with a release agent. The fabric will be peeled off after the
resin is infused.
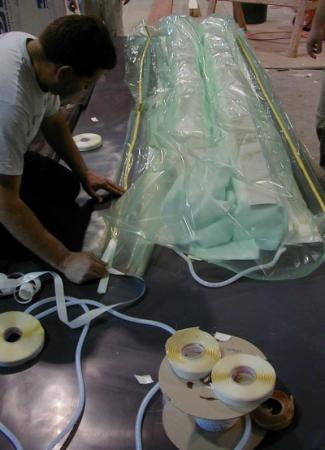 The arms were then laid out neatly inside a "bag". I was a bit confused at first that
a bag might not be bag shaped. Instead the greenish plastic is glued down to the table
using a yellowish sticky tape. A vacuum pump is then hosed in so as to remove all the
air inside the bag.
The arms were then laid out neatly inside a "bag". I was a bit confused at first that
a bag might not be bag shaped. Instead the greenish plastic is glued down to the table
using a yellowish sticky tape. A vacuum pump is then hosed in so as to remove all the
air inside the bag.
The goal is not to suffocate any bugs that might be hidden inside. Instead the vacuum
will suck the resin into the fiberglass providing a very solid total coverage of all
the fiberglass, including the the sheet glued between the two sheets of foam pictured
earlier. Good thing we used closed cell roofing foam for the core.
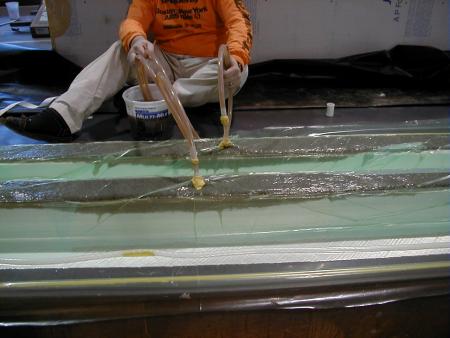 Once all the air is sucked out, the resin is slurped right into the arms. You can
see the dark resin has already traveled the entire length of the arm and is moving
downward across the sides. There is a special feed channel with the brand of
"Colbond CX1000 infusion flow medium" at work there. This helps the resin quickly
flow great distances for better coverage.
Once all the air is sucked out, the resin is slurped right into the arms. You can
see the dark resin has already traveled the entire length of the arm and is moving
downward across the sides. There is a special feed channel with the brand of
"Colbond CX1000 infusion flow medium" at work there. This helps the resin quickly
flow great distances for better coverage.
The plumbing was all rather boring plastic semi-flexible tubing. A split spiral tube
was used to distribute the vacuum. See just under the blue arm on a white sheet of
fiberglass. The extra fiberglass on the table prevents the bag from sealing to the
table.
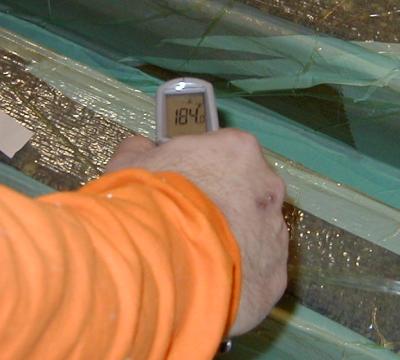 The resin is Ashland Chemical Company polyester thermoset resin. After the resin
started setting, we used a temperature sensor and found that the arms were quite
toasty warm. There were other hotter spots reaching into the low 200 degrees
Fahrenheit.
The resin is Ashland Chemical Company polyester thermoset resin. After the resin
started setting, we used a temperature sensor and found that the arms were quite
toasty warm. There were other hotter spots reaching into the low 200 degrees
Fahrenheit.
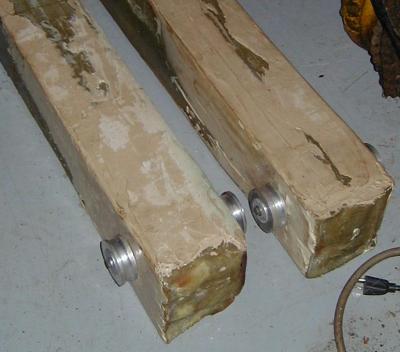
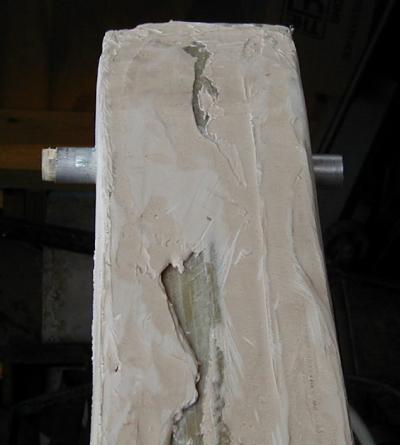 Once we got the arms home, we needed to get them ready for use in the ballista.
In this picture, you can see the special light-weight filler we used to smooth down
the arms so that it would not chafe the bowstring.
Once we got the arms home, we needed to get them ready for use in the ballista.
In this picture, you can see the special light-weight filler we used to smooth down
the arms so that it would not chafe the bowstring.
Also, we drove an aluminum rod through the end of the arm. This pin is aluminum
pipe with a wooden dowel stuffed through it.
 Once the pin was done, we were able to bolt on two special washers that were cut to manage the
loops on the end of our new high-tech bowstring.
Once the pin was done, we were able to bolt on two special washers that were cut to manage the
loops on the end of our new high-tech bowstring.
|
Fibreglass arms at the 2004 Chunk
|
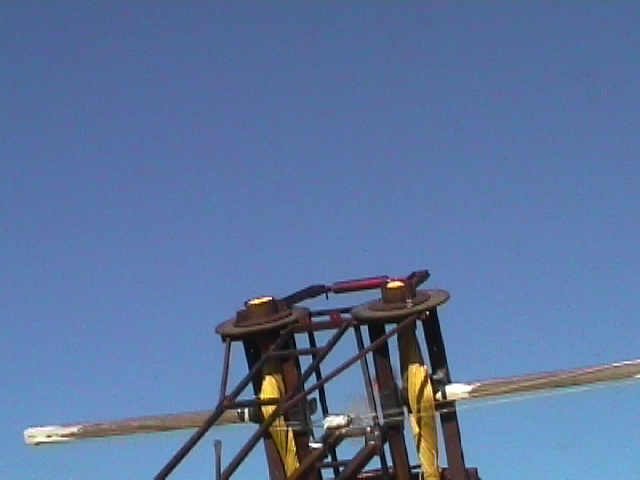
These arms made it to the 2004 Punkin Chunk, and work very well for us. Unlike
previous years, the arms did not fail. Instead, the arms beat our frame until it
bent. Perhaps bent arms were better.
 Here is a view of the arm while under tension. You can see the new bowstring
mounting hardware, and you can see that the arm is flexing ever so slightly.
Here is a view of the arm while under tension. You can see the new bowstring
mounting hardware, and you can see that the arm is flexing ever so slightly.
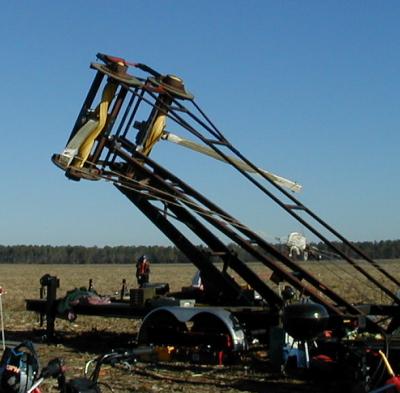 Another view of the arms in action, flexing ever so slightly. The "white stuff"
on the ends is a light weight filler that covered over the rough edges to protect
our bowstring.
Another view of the arms in action, flexing ever so slightly. The "white stuff"
on the ends is a light weight filler that covered over the rough edges to protect
our bowstring.
Unfortunately, those fancy fiberglass arms broke at the 2005 chunk. We were all very
sad, but we did make some new arms which will hopefully
serve us much better.
Move mouse over a frame number to switch to a different frame view.
In this animation you can see the bowstring slinging the pumpkin. Then in frame 3
the stanchions bend, and the pumpkin is pulverized. In frame 6, the remaining bits
of pumpkin are sent skyward.
|
Additional Pages for Mista Ballista
|
|
Mista Ballista
|
 Mista Ballista is _Team Tormentum's_ *Torsion Division* competition catapult.
|
|
Mista Ballista : Modiolus and Epizygis
|
 In 2008, Dave devised a new system for managing the torsion in Mista Ballista with his friends Karl Hamm and Kevin Cheney.
This represents a large investment in our machine in these custom parts.
In 2008, Dave devised a new system for managing the torsion in Mista Ballista with his friends Karl Hamm and Kevin Cheney.
This represents a large investment in our machine in these custom parts.
|
|
Mista Ballista : Bowstring
|
 The bowstring has been one of the most challenging pieces of our torsion engine. It is the last piece to get right, and has been the most likely part to fail in any given year.
|
|
Mista Ballista : Rope Bundles
|
 The rope bundles are the main engine of the machine. The framework that holds
everything together is about 24 ft long, and 6 feet tall.
The rope bundles are the main engine of the machine. The framework that holds
everything together is about 24 ft long, and 6 feet tall.
|
|
Mista Ballista : 2005 Rope bundle Upgrade
|
 At the 2004 chunk the main stanchions for the torsion frames were bent by the impact of the arms.
You can see the animation of when this happened on the Mista Ballista Arms page.
At the 2004 chunk the main stanchions for the torsion frames were bent by the impact of the arms.
You can see the animation of when this happened on the Mista Ballista Arms page.
|
|
Mista Ballista : 2006 Rope Bundle Reconfiguration
|
 In 2005 we broke our fancy fiberglass arms. In 2006 we got the new carbon fiber arms
and video taped them in action in the summer at our 2006 History Chunk. This led us to discover how much they bounced around
the outer stanchions. We were getting multiple recoils after every shot, sometimes back at least 30 degrees. That was also just with 2000 lbs of pullback, which is much less than we expect to use in competition.
In 2005 we broke our fancy fiberglass arms. In 2006 we got the new carbon fiber arms
and video taped them in action in the summer at our 2006 History Chunk. This led us to discover how much they bounced around
the outer stanchions. We were getting multiple recoils after every shot, sometimes back at least 30 degrees. That was also just with 2000 lbs of pullback, which is much less than we expect to use in competition.
|
|
Mista Ballista : Frame
|
 The framework for the Ballista had to be built strong enough to resist the pullback, and to hold up
the 2500 pounds we currently estimate of our engine. It must also push it up 16 feet in the air!
The framework for the Ballista had to be built strong enough to resist the pullback, and to hold up
the 2500 pounds we currently estimate of our engine. It must also push it up 16 feet in the air!
|
|
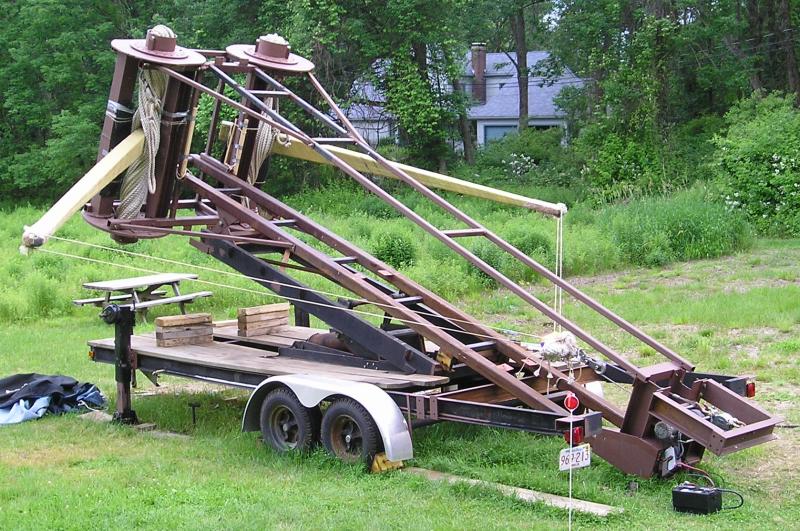
Mista Ballista : Trailer
|
 One of our goals for the 2003 season is to acquire a dedicated trailer for Mista Ballista.
|
|
Mista Ballista : Torsion
|
 Mista Ballista's engine operates on torsion from twisted rope bundles. One of the biggest challenges
of torsion for this machine has been adding the twist. An onager is pretty straight forward in that a large lever and gravity can be used. With our ballista, the direction of twist is sideways, so an alternate means of twisting is needed.
Mista Ballista's engine operates on torsion from twisted rope bundles. One of the biggest challenges
of torsion for this machine has been adding the twist. An onager is pretty straight forward in that a large lever and gravity can be used. With our ballista, the direction of twist is sideways, so an alternate means of twisting is needed.
|
|
Mista Ballista : Arms
|
 After the failure of our arms in 2007, a new tactic was needed. Dave contacted his friends Karl Hamm and Kevin Cheney about designing
and building a set of ballista arms out of aluminum. Aluminum was chosen for its strength and light weight.
After the failure of our arms in 2007, a new tactic was needed. Dave contacted his friends Karl Hamm and Kevin Cheney about designing
and building a set of ballista arms out of aluminum. Aluminum was chosen for its strength and light weight.
|
|
Mista Ballista : Deployment
|
 To travel to different chunkin' locations, we need to pack the system down onto our trailer.
Deploying from the folded up position is challenging and time consuming, taking a day and a half
at the 2002 chunk. This year at the 2003 Punkin Chunk, we were done in about 4 hours.
To travel to different chunkin' locations, we need to pack the system down onto our trailer.
Deploying from the folded up position is challenging and time consuming, taking a day and a half
at the 2002 chunk. This year at the 2003 Punkin Chunk, we were done in about 4 hours.
|
|
Mista Ballista : Hydraulic and Electric Power
|
 Mista Ballista uses hydraulics for lifting the engine to a 45 degree angle for firing, and also for winding the cord bundles.
We also like having electricity on hand since Mr. B has a tendency to break, and need on-field repairs. This page describes
what we are using to power up the system.
Mista Ballista uses hydraulics for lifting the engine to a 45 degree angle for firing, and also for winding the cord bundles.
We also like having electricity on hand since Mr. B has a tendency to break, and need on-field repairs. This page describes
what we are using to power up the system.
|
|
Mista Ballista : Mystery Parts
|
 All winter during 2003 we have been collecting the parts we need to accomplish our 2003 chunk goals.
Here are a bunch of pictures of these random parts. Can you guess what they are for?
All winter during 2003 we have been collecting the parts we need to accomplish our 2003 chunk goals.
Here are a bunch of pictures of these random parts. Can you guess what they are for?
|
|
Mista Ballista : Modiolus and Epizygis 2007
|
 This page describes the Modiolus and Epizygis system we used from 2002 through 2007. In 2008 we developed
a new system for twisting up Mista Ballista.
This page describes the Modiolus and Epizygis system we used from 2002 through 2007. In 2008 we developed
a new system for twisting up Mista Ballista.
|
|
Mista Ballista : Torsion 2007
|
 All torsion catapults depend on twisting the rope bundles to create the engine to drive the catapult. Mista Ballista went through
many phases as we attempted to add more power every year to our throw. This page describes the obsolete systems
we'd used in the past.
All torsion catapults depend on twisting the rope bundles to create the engine to drive the catapult. Mista Ballista went through
many phases as we attempted to add more power every year to our throw. This page describes the obsolete systems
we'd used in the past.
|
|
Mista Ballista : Arms 2006 - 2007
|
 This page describes the construction of our dearly departed Carbon Fiber composite arms. We miss them.
|
|
Mista Ballista : Failed Arms
|
Building an arm for a torsion machine this large has proven to be very challenging.
Based on the experiences of our competitors, who also keep breaking arms, we find that
we are not alone in this dilemma.
|
|